
Layer in A:M
This tutorial should show of the basic possibilities of Layers in A:M-Scenes.
Requirements:
- A:M 7.0 or newer (I used A:M 13.0)
- Photoshop or an alike 2d-program
- Basic knowledge of these programs
What is a layer?
Layer are simply images (or AVI-Animations), which can be put in a 3d-Scene. Layer can be explained if you imagine a plate, which has a texture applied to it. You can put and animate these plates like you want. Anyway I don\'t recommend an flythrough with layers. This is possible, but to make the layer-nature invisible is not very easy to archieve. We will have a look at one possibility to do that at the end of the tutorial.
The difference between layers in A:M and layers in for instance Photoshop, an \'post-production\'-application is, that in A:M the layer is handled as a 3d-Object with a z-index. You can easily cover one object with another and you can animate them as you wish.
The Result
In the image you can see the end-result which will be created in this tutorial.
The sun and the planes are real 3d-objects while the clouds are layers in A:M

")
The different layers
Below you can see the two images, which were used as layers in the scene.
You could do some rework, recut them etc., but the principle behind it will be clear anyway. To create a cloud-layer like this with soft edges, you can use a mask with a gradient applied to it or you can use the more unpredictable methode of a Feathered Selection.
This can be found at Select > Feather / Select > Soft Selection / Feathered Selection in Photoshop
The composition in A:M v13
It is all quite simple: In A:M the different layers are placed behind each other and the 3d-objects are placed inbetween. You will create the impression of depth with that if you cover some parts of the objects with the layers.
")
Last Preperations
To guide you through the tutorial I will give you Step-By-Step-Briefings for A:M.
You will need the used materials which can be found here:
Layer-Tutorial Data(ZIP, 1.61 MB)
(The plane-model is from the Hash A:M 2006-CD, the layer are from royality-free photoportals in the internet.)
Of course you can use your own materials, the principles will be the same.
Please start A:M now and open the ProjectWorkSpace-Window(PWS) and the Timeline if they are not open already, you will find them at View > ProjectWorkSpace / Timeline.
At Tools > Options on the tab Global you will find two other settings which sould be activated too: Show advanced properties and Show Property Triangle.

Load
In the PWS you can find an folder named Images. Use your rightmousebutton on the folder and choose Import > Image. (if you want to use a imagesequence you should use the other spot here).
Now import the different layers. We are using *.png-files, so we do not need to cope with the alpha-channel. The image has a transparency in it.
If you are using *.jpg/*.jpeg-files, you can set a Keycolor in A:M to define which color should be transparent. I would not recommend this methode... it is always better to use a *.tga with an Alpha-channel or a *.png.
To import the plane-model and the sun you just have to use the right-mouse-button on the Objects-folder and import the model (*.mdl).
Put them in the Choreography
To position something, you have to create a choreography. Use the right-mouse-button on the folder Choreographies and choose New > Choreography.
Now drag and drop the images into the choreography.
You will see a menu which will ask you if you want to import them as a Layer or a Rotosope. Please choose Layer here.
Now drag and drop the models into the choreography.

")
Scaling
The objects and layers will most likly have a wrong scale. The plane-model will be to big and the layers to small.
Above the modeling-window you can find the scale-tool. You can now scale the object by using the yellow boxes at the edges of the model. If you only want to scale on one or two askes, you can use the second button next to the scale-tool.
Position
To position the objects there are two possibilites. The better one is to position through the translate-tool.
With this tool you are able to move the object at only one axis. The colored handlers will show you which of the axis they manipulated.
From the bird-view (Num-Pad: 7) or from the camera-view (Num-Pad: 1) you can now position the object.
Another methode is to go to the site-view (Num-Pad: 4, 6) and the \'top\'-view (Num-Pad: 5) and now use the translate-tool.
This will be difficult with layers, because from the site or the top-view you can select them very well. Here the first methode is the better one.
")

Camera
Now you should translate the camera as you wish it to be. On the image are my camera-informations.
Lightening
The flair will be created through the lights.
You can see my lightening on the next image, but you can of course use another one. Just play with the lights a bit.
I used a bulb-light with the default lensflair-settings and two spot-lights which are marked with a color.
")
Motion Blur and Glow
Glow will be presetted for the sun. Just have a look at the properties of the "sun"-material, the setting on the group-surface-property and the choreography.
"Motion Blur" is something that isn't available in the nature. The effect is something which was discovered with the first cameras and today we are used to it.
To activate "motion blur" in A:M, we need motion. We will create an action for the propeller of the plane now.

Action for the propeller
You can create an action by using your right-mouse-button on the folder Actions and choose New. Tell A:M which model should be used and choose the plane.
An action-window will open.
1.) Marked red: Go to the skeletal-mode and select the propeller-bone.
2.) Marked green: Go to the rotate-mode and rotate the propeller-bone on the y-axis. Now bring it back in the default-position (manually, do not use undo).
Now we actiavted the bone and a keyframe was setted.
3.) Marked blue: You can although do that with the Force-Keyframe-Button if you click on it with the leftshift-button pushed.
4.) Marked yellow: Now reposition the time-line-handler one frame to the right and rotate the propeller-bone by 90 degrees.
Repeat this till you rotated the bone by 360 degrees. You should have 4 keyframes now.
5.) Now select all 4 keyframes and you will have a border around the keyframes with scale-handlers.
A propller of a plane is rotating very fast, so you will scale the keyframes in the time.
6.) Above the keyframes you will see a blue bar, which indicates how long the action is. Please realign this to the last keyframe.
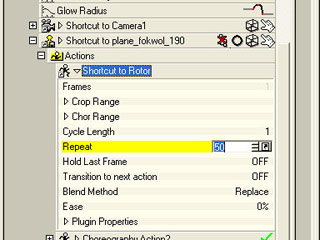
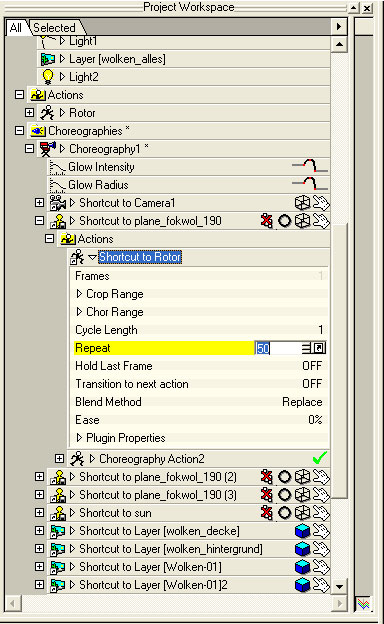
Applying the action
Please drag&drop the action on the plane in the choreography.
Click on the small arrow next to the plane in the PWS and you will see two actions: A choreography-action and the propeller-action.
With a click on the arrow next to the propeller-action you get the properties. At repeat set a value like 10. Blend-Methode should be setted to Replace.
Now the propeller should move.
Rendering
With a double-click at the choreography it should open, if it is not opened already.
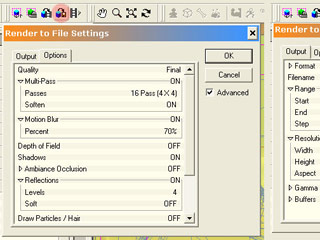
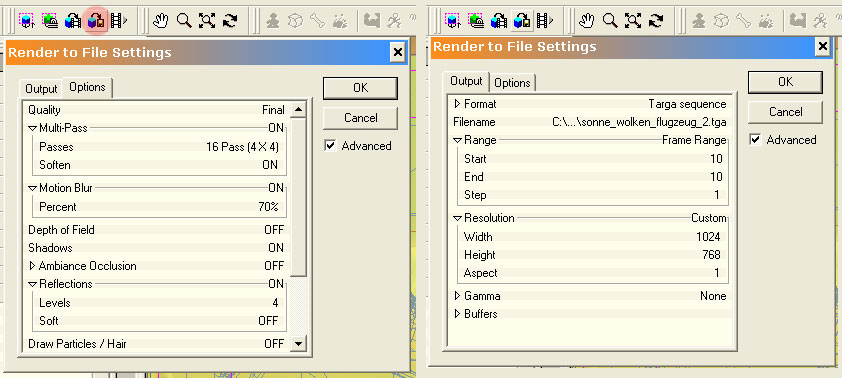
Now go to the camera-view (Num-Pad: 1). In the image you can see the red marked render to file-button. Click on it to access the rendering-window. You can set it to the settings in the image.
Do you like it?
Now you only have to start the rendering and wait a little while to get an alike result as on the first image.
I hope the tutorial was helpful. If you have any questions, please contact me with this mail form.